HTML id Attribute
The id Attribute
The id attribute specifies a unique id for an HTML element. The value of the id attribute must be unique within the HTML document.
The id attribute is used to point to a specific style declaration in a style sheet. It is also used by JavaScript to access and manipulate the element with the specific id.
The syntax for id is: write a hash character (#), followed by an id name. Then, define the CSS properties within curly braces {}.
In the following example we have an <h1> element that points to the id name “myHeader”. This <h1> element will be styled according to the #myHeader style definition in the head section:
Example
|
1 2 3 4 5 6 7 8 9 10 11 12 13 14 15 16 17 18 19 20 21 |
<!DOCTYPE html> <html> <head> <style> #myHeader { background-color: lightgreen; color: black; padding: 40px; text-align: center; } </style> </head> <body> <h2>The id Attribute</h2> <p>Use CSS to style an element with the id "myHeader":</p> <h1 id="myHeader">My Header</h1> </body> </html> |
Result
The id Attribute
Use CSS to style an element with the id “myHeader”:

Chapter Summary
- The
idattribute is used to specify a unique id for an HTML element - The value of the
idattribute must be unique within the HTML document - The
idattribute is used by CSS and JavaScript to style/select a specific element - The value of the
idattribute is case sensitive - The
idattribute is also used to create HTML bookmarks - JavaScript can access an element with a specific id with the
getElementById()method.
HTML class Attribute
The class Attribute
The class attribute is often used to point to a class name in a style sheet. It can also be used by JavaScript to access and manipulate elements with the specific class name.
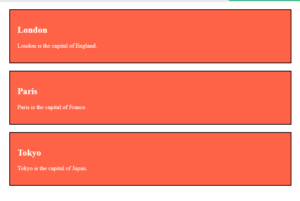
In the following example we have three <div> elements with a class attribute with the value of “city”. All of the three <div> elements will be styled equally according to the .city style definition in the head section:
Example
|
1 2 3 4 5 6 7 8 9 10 11 12 13 14 15 16 17 18 19 20 21 22 23 24 25 26 27 28 29 30 31 32 |
<!DOCTYPE html> <html> <head> <style> .city { background-color: tomato; color: white; border: 2px solid black; margin: 20px; padding: 20px; } </style> </head> <body> <div class="city"> <h2>London</h2> <p>London is the capital of England.</p> </div> <div class="city"> <h2>Paris</h2> <p>Paris is the capital of France.</p> </div> <div class="city"> <h2>Tokyo</h2> <p>Tokyo is the capital of Japan.</p> </div> </body> </html> |
Result
Multiple Classes
HTML elements can belong to more than one class.
To define multiple classes, separate the class names with a space, e.g. <div class=”city main”>. The element will be styled according to all the classes specified.
In the following example, the first <h2> element belongs to both the city class and also to the main class, and will get the CSS styles from both of the classes:
Example
|
1 2 3 |
<h2 class="city main">London</h2> <h2 class="city">Paris</h2> <h2 class="city">Tokyo</h2> |
Different Elements Can Share Same Class
Different HTML elements can point to the same class name.
In the following example, both <h2> and <p> point to the “city” class and will share the same style:
Example
|
1 2 |
<h2 class="city">Paris</h2> <p class="city">Paris is the capital of France</p> |
HTML <style> Tag
Definition and Usage
The <style> tag is used to define style information (CSS) for a document.
Inside the <style> element you specify how HTML elements should render in a browser.
The <style> element must be included inside the <head> section of the document.
Example
|
1 2 3 4 5 6 7 8 9 10 11 12 13 14 15 |
<!DOCTYPE html> <html> <head> <style> h1 {color:red;} p {color:blue;} </style> </head> <body> <h1>This is a heading</h1> <p>This is a paragraph.</p> </body> </html> |
Result

HTML <title> Tag
Definition and Usage
The <title> tag defines the title of the document. The title must be text-only, and it is shown in the browser’s title bar or in the page’s tab.
The <title> tag is required in HTML documents!
The contents of a page title is very important for search engine optimization (SEO)! The page title is used by search engine algorithms to decide the order when listing pages in search results.
The <title> element:
- defines a title in the browser toolbar
- provides a title for the page when it is added to favorites
- displays a title for the page in search-engine results
Here are some tips for creating good titles:
- Go for a longer, descriptive title (avoid one- or two-word titles)
- Search engines will display about 50-60 characters of the title, so try not to have titles longer than that
- Do not use just a list of words as the title (this may reduce the page’s position in search results)
So, try to make the title as accurate and meaningful as possible!
Example
|
1 2 3 4 5 6 7 8 9 10 11 12 |
<!DOCTYPE html> <html lang="en"> <head> <title>HTML Elements Reference</title> </head> <body> <h1>This is a heading</h1> <p>This is a paragraph.</p> </body> </html> |
HTML <a> href Attribute
Definition and Usage
The href attribute specifies the URL of the page the link goes to.
If the href attribute is not present, the <a> tag will not be a hyperlink.
Example
|
1 |
<a href="https://www.codenbytes.com">Visit Codenbytes</a> |
HTML <img> src Attribute
Definition and Usage
The required src attribute specifies the URL of the image.
There are two ways to specify the URL in the src attribute:
1. Absolute URL – Links to an external image that is hosted on another website. Example: src=”https://www.w3schools.com/images/img_girl.jpg”.
Notes: External images might be under copyright. If you do not get permission to use it, you may be in violation of copyright laws. In addition, you cannot control external images; it can suddenly be removed or changed.
2. Relative URL – Links to an image that is hosted within the website. Here, the URL does not include the domain name. If the URL begins without a slash, it will be relative to the current page. Example: src=”img_girl.jpg”. If the URL begins with a slash, it will be relative to the domain. Example: src=”/images/img_girl.jpg”.
Example
|
1 |
<img src="img_girl.jpg" alt="Girl in a jacket" /> |
HTML <img> alt Attribute
Definition and Usage
The required alt attribute specifies an alternate text for an image, if the image cannot be displayed.
The alt attribute provides alternative information for an image if a user for some reason cannot view it (because of slow connection, an error in the src attribute, or if the user uses a screen reader).
Example
|
1 |
<img src="img_girl.jpg" alt="Girl in a jacket" width="500" height="600"> |